I noticed that many beginning iOS developers see the launch process of an iOS app as a bit of a mystery. Somehow, someone sends our application delegate an
The execution of every C program starts with a function called
Looking at the documentation for
Let’s take this apart step by step:
application:didFinishLaunchingWithOptions: message, seemingly the first place where we have chance to inject code of our own. But how does our app get there? main()
The execution of every C program starts with a function called
main(), and since Objective-C is a strict superset of C, the same must be true for an Objective-C program. If you create a new iOS project from one of the default templates, Xcode places this function in a separate file called main.m in theSupporting Files group. Usually, you never have to look at that file but let’s do. This is the entire code ofmain():
The function’s arguments
argc and argv contain info about the command-line arguments passed to the executable on launch. We can safely ignore them for this discussion. Let’s have a look at what the function does, which seems to be very litte:- It creates an autorelease pool because in every Cocoa app one must exist at all times (otherwise, anautorelease call would fail).
- It calls a function named UIApplicationMain(). We will take a deeper look at it below.
- It drains the autorelease pool it just created.
- It returns the return value of UIApplicationMain() to its caller (which is the shell that launched the executable).
main(), it ends. So this looks like a very short program indeed. Nevertheless, this is how all iOS apps work, so the secret must be theUIApplicationMain() function. Should it ever return, our program would end immediately. UIApplicationMain()
Looking at the documentation for
UIApplicationMain(), we find this:
This function instantiates the application object from the principal class and and instantiates the delegate (if any) from the given class and sets the delegate for the application. It also sets up the main event loop, including the application’s run loop, and begins processing events. If the application’s Info.plist file specifies a main nib file to be loaded, by including theNSMainNibFile key and a valid nib file name for the value, this function loads that nib file.
Despite the declared return type, this function never returns.

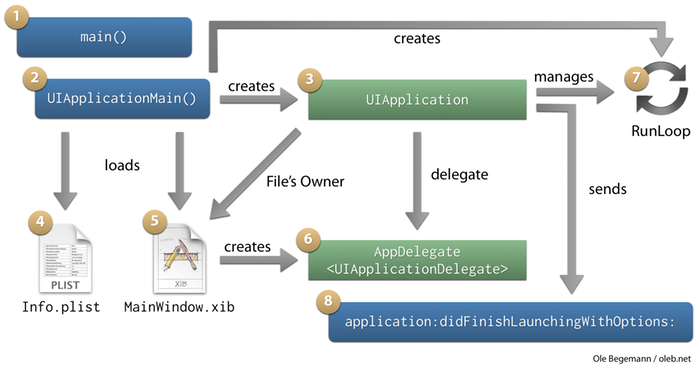
Flowchart of the app launch sequence on iOS 4.
- First, the function creates the main application object (step 3 in the flowchart). If you specify
nilas the third argument toUIApplicationMain()(the default), it will create an instance ofUIApplicationin this step. This is usually what you want. However, if you need to subclassUIApplication(for example, to override its event handling insendEvent:), you have to pass a string with the name of your subclass toUIApplicationMain(). - The function then looks at its fourth argument. If it is non-nil, it interprets it as the name of the class for the application delegate, instantiates an object of this class and assigns it as the application object’s
delegate. The default for the fourth argument isnil, though, which signifies that the app delegate will be created in the main NIB file. - Next,
UIApplicationMain()loads and parses your app’sInfo.plist(step 4). If it contains a key named “Main nib file base name” (NSMainNibFile), the function will also load the NIB file specified there (step 5). - By default, the main NIB file is called
MainWindow.nib. It contains at least an object representing the application delegate, connected to the File’s Owner’sdelegateoutlet (step 6), and aUIWindowobject that will be used as the app’s main window, connected to an outlet of the app delegate. If you used a view-controller-based app template, the NIB file will also contain your app’s root view controller and possibly one or more view child controllers.It is worth mentioning that this is the only step where the UIKit-based app templates (Window-based, View-based, Navigation-based, Tab-based, etc.) differ significantly from each other. If you started out with a view-based app and later want to introduce a navigation controller, there is no need to start a new project: simply replace the root view controller in the main NIB file and adjust one or two lines of code in the app delegate. I noticed that many newbies to the iOS platform struggle with this problem and assume a huge difference between the different project templates. There isn’t. - Now,
UIApplicationMain()creates the application’s run loop that is used by theUIApplicationinstance to process events such as touches or network events (step 7). The run loop is basically an infinite loop that causesUIApplicationMain()to never return. - Before the application object processes the first event, it finally sends the well-known
application:didFinishLaunchingWithOptions:message to its delegate, giving us the chance to do our own setup (step 8). The least we have to do here is put our main window on the screen by sending it amakeKeyAndVisiblemessage.
Entry points
You see, there is no magic here. Besides
application:didFinishLaunchingWithOptions:, there are several more entry points for custom code during the launch sequence (none of which are usually needed):- Directly in
main()beforeUIApplicationMain()is called. - The
initmethod of a customUIApplicationsubclass. - The
initWithCoder:orawakeFromNibmethods of our application delegate if it is created from a NIB file (the default). - The
+initializemethods of our application delegate class or a customUIApplicationsubclass. Any class receives an+initializemessage before it is sent its first message from within the program.
Note that this sequence only happens at the actual launch of an app. If the app is already running and simply brought back from the background, none of this occurs.
No comments:
Post a Comment
Note: Only a member of this blog may post a comment.